hello sir, try the same command but instead of using “-p swisseos@active” use “eosio.token@active”
the only account with the permissions to issue a token is the “eosio.token” account.
Hope you find this useful! 
Carlos Z.

hello sir, try the same command but instead of using “-p swisseos@active” use “eosio.token@active”
the only account with the permissions to issue a token is the “eosio.token” account.
Hope you find this useful!
Carlos Z.
I think you mistype the command, probably?
Your command on the screenshot:
cleos push action eosio.token issue ‘[“swisseos”, “1000 DOGCOIN”, “memo”]’ eosio.token@active
You forgot to add the “-p” (permission level from) in the command line:
cleos push action eosio.token issue ‘[“swisseos”, “1000 DOGCOIN”, “memo”]’ -p eosio.token@active
Hope you find this useful!
If you have any doubt, please let us know so we can help you!
Carlos Z.
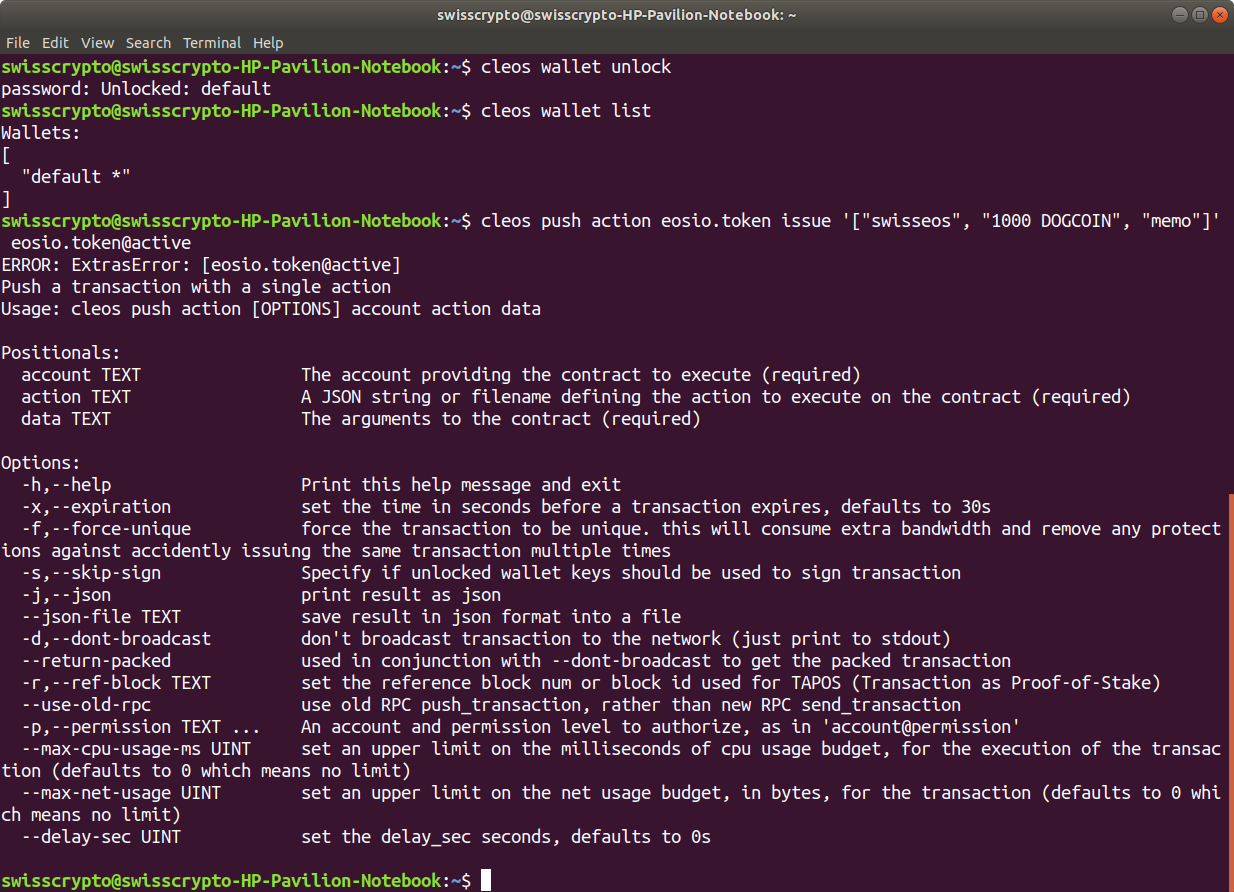
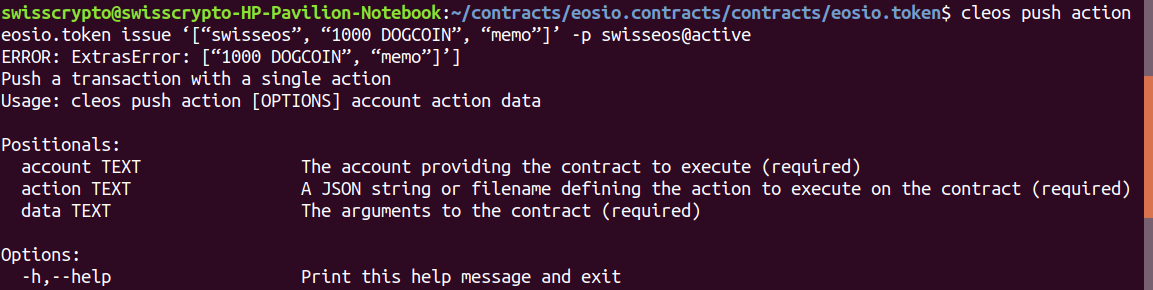
Thanks Carlos. In fact I thought I had to remove -p. But now I understand that -p means permission level to authorize, and yes it makes sense to have it. However, I still get the same error:
What I wrote is:
cleos push action eosio.token issue '["swisseos", "1000 DOGCOIN", "memo"]' -p eosio.token@active
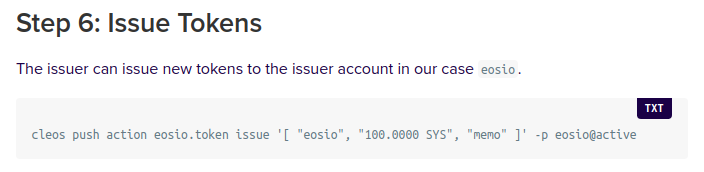
I tried, without success, with -p eosio@active instead of -p eosio.token@active, as written in Step 6 of How to create, issue and transfer a token in the EOSIO Manual, as follows:
If I follow their instruction, it should be:
cleos push action eosio.token issue ‘[“swisseos”, “1000 DOGCOIN”, “memo”]’ -p swisseos@active
(as swisseos is my account)
and this is the line that we have in the video as well, with bob as account:
… but I get the same error  :
:
ERROR: ExtrasError: [“1000 DOGCOIN”, “memo”]’]
Push a transaction with a single action
Usage: cleos push action [OPTIONS] account action data
Any idea what I need to do?
Hello sir, sorry for the long wait to reply, now did you Set permissions command to the contract before trying to send some actions on it?
cleos set account permission [account] active --add-code
For you should be:
cleos set account permission swisseos active --add-code
If you still have the same error, please send me a screenshot so i can check exactly what is the error on the command that you are typing.
Hope you find this useful!
If you have any doubt, please let us know so we can help you!
Carlos Z.
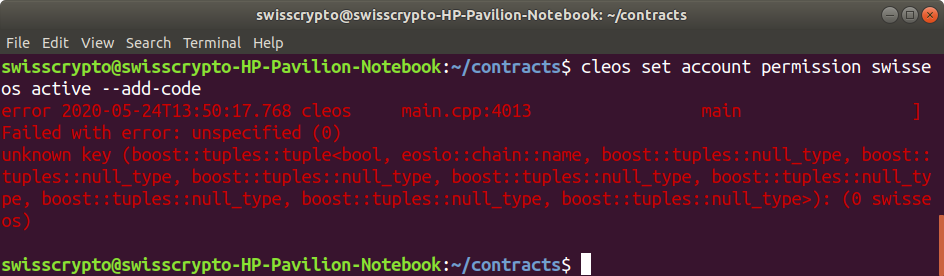
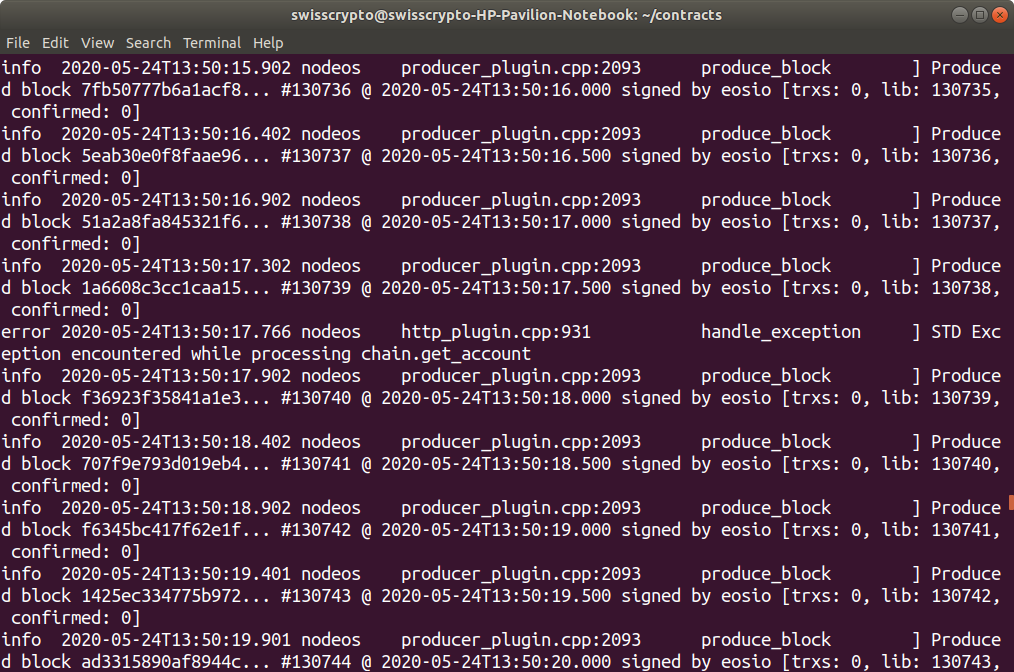
Hi Carlos, no problem, now here is the error I get when I try to set the permission command:
The error seems to refer to 24T13:50:17 in my nodeos window:
Thank you for your assistance!
Ok you probably miss an step before deploying the contract, please take a look at my notes here, follow them closely, that is an step by step to deploy quickly the contracts without any issue in the path.
Hope you find this useful!
If you have any doubt, please let us know so we can help you!
Carlos Z.
Thank you Carlos for your notes, I went through them step by step from Creating Wallet to Sending Actions to Contracts, they are really useful to better understand the cleos commands, but I still get stuck at the same point and I cannot issue tokens. I am seeking assistance at this point, because I cannot move further in the course  @thecil @filip
To recapitulate what I have done following Filip’s steps in the course, and in line with your notes, Carlos, still respecting the order of the course:
eosio development key (5KQwrPbwdL6PhXujxW37FSSQZ1JiwsST4cqQzDeyXtP79zkvFD3).git clone.eosio.token directory, I successfully compiled the contract.eosio.token.set account permission eosio.token active --add-codecleos get account, I got my actual account:The encountered error is:
Error 3090003: Provided keys, permissions, and delays do not satisfy declared authorizations
Error Details:
transaction declares authority '{"actor":"swisseos","permission":"active"}', but does not have signatures for it.
However, I have the private key imported in my wallet, and my wallet was unlocked when I ran the cleos push action command.
The command I ran was:
cleos push action eosio.token issue '[ "swisseos", "100 DOGCOIN", "memo"]' -p swisseos@active
(swisseos is the issuer, it could be bob or another one…)
It corresponds to the code shown in the course:

I would be happy to get over this hurdle! 

Your help would be greatly appreciated!
Ok the issue is on your eosio.token account private key, the public key that you have on the eosio.token account does not looks like the exact public key, if you use the same private key that i have use, this should be result:
Using the command:
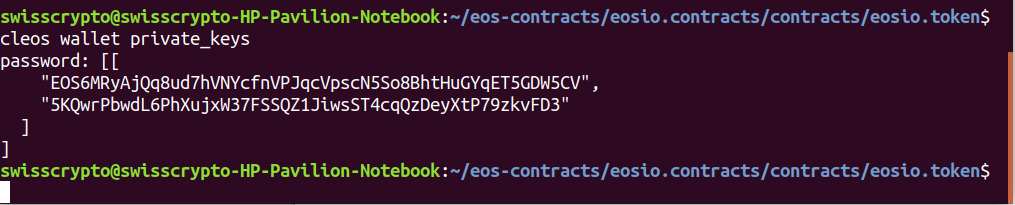
cleos wallet private_keys
You should get all the keys that you have imported on the wallet(s), mine for example is this one:
Public key 1st, Private key 2nd (watch that i have the same private key that you import from my notes, so you should have the same public key that i have.
[
    "EOS6MRyAjQq8ud7hVNYcfnVPJqcVpscN5So8BhtHuGYqET5GDW5CV",
    "5KQwrPbwdL6PhXujxW37FSSQZ1JiwsST4cqQzDeyXtP79zkvFD3"
  ]
you can try the following:
Step 1:
Check all the private keys that you have listed in your wallet, just use:
cleos wallet private_keys
Step 2: OPTIONAL, SKIP IF NOT SURE WHAT YOU ARE DOING
Please skip this step if you really dont know what you are doing, if you delete the private key before change the keys, you will lost access to the eosio.token account since you dont have the private keys permissions to do those changes.
Lets remove the incorrect private key that you have on the wallet:cleos wallet remove_key [PASTE THE PUBLIC KEY HERE]
Remember only to paste the public key, no needs for the brackets
Step 3:
Import the same private key for the eosio.token account into your “swisseos” wallet:
cleos wallet import
It will ask you to paste the private key use: 5KQwrPbwdL6PhXujxW37FSSQZ1JiwsST4cqQzDeyXtP79zkvFD3
Step 4:
Repeat Step 1, to ensure that now you have the same Public Key for the Private Key imported (should be the same as I have).
IF true:
We have to change the Keys on the eosio.token account, we can do it with:
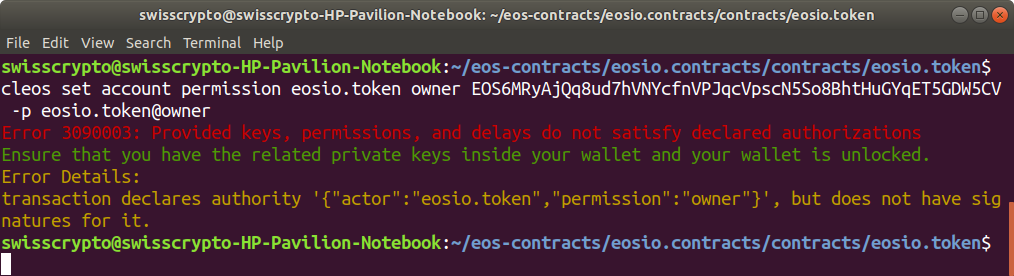
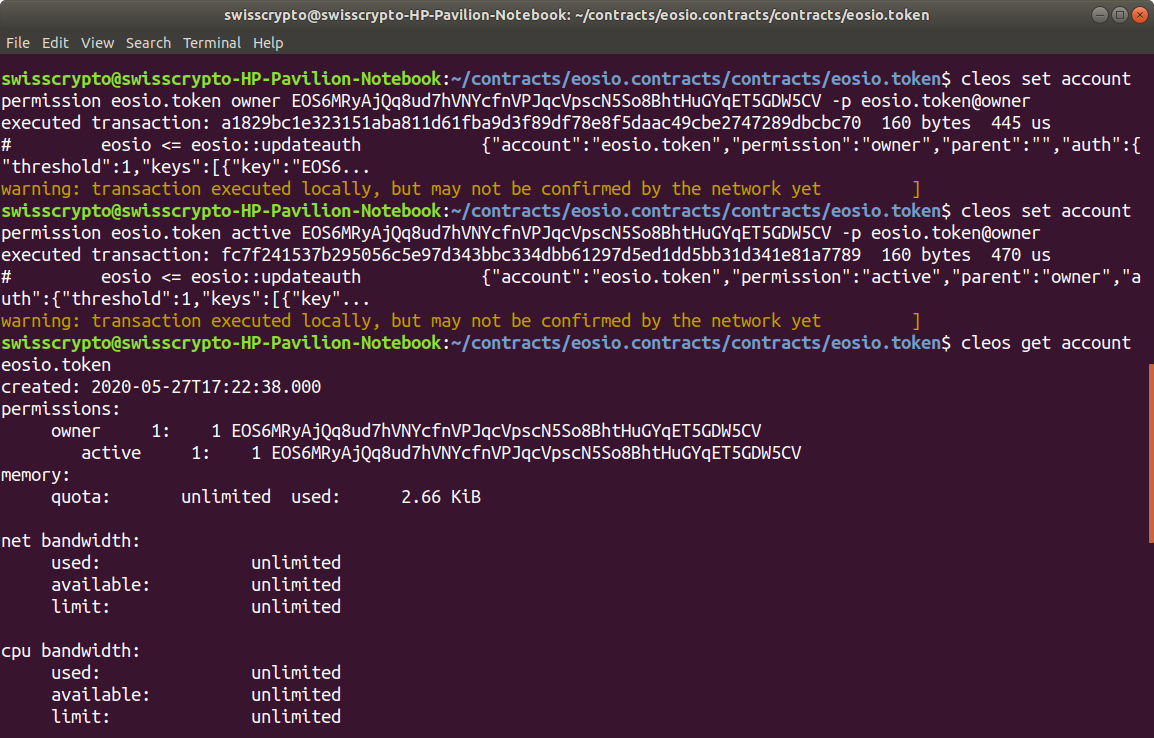
1st Change the Owner Key with:cleos set account permission eosio.token owner EOS6MRyAjQq8ud7hVNYcfnVPJqcVpscN5So8BhtHuGYqET5GDW5CV -p eosio.token@owner
2nd Change the Active Key with:
cleos set account permission eosio.token active EOS6MRyAjQq8ud7hVNYcfnVPJqcVpscN5So8BhtHuGYqET5GDW5CV -p eosio.token@owner
Step 5:
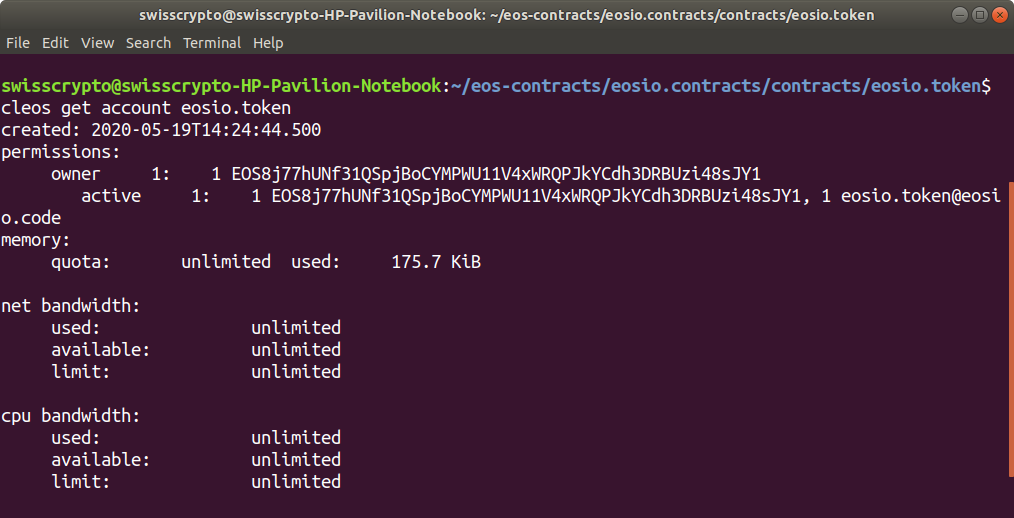
Check if the account has the new Owner and Active keys set it correctly:
cleos get account eosio.token
Step 6:
If is correct, you now should be able to issue the tokens to the account.
Hope you find this useful!
If you have any doubt, please let us know so we can help you!
Carlos Z.
Thanks Carlos.
You are correct. When I ran cleos wallet private_keys (Step 1), it returned two keypairs instead of one.
So I went to Step 2 and removed the incorrect second keypair that I had in my wallet.
Now I have the correct keypair in my wallet, like yours:
EOS6MRyAjQq8ud7hVNYcfnVPJqcVpscN5So8BhtHuGYqET5GDW5CV
5KQwrPbwdL6PhXujxW37FSSQZ1JiwsST4cqQzDeyXtP79zkvFD3
Step 3:
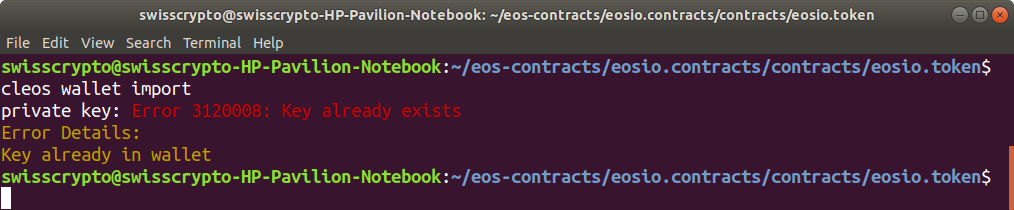
I ran cleos wallet import and pasted the 5KQwrPbwdL6PhXujxW37FSSQZ1JiwsST4cqQzDeyXtP79zkvFD3 private key. I get an error because the key already exists and is already in the wallet:
It makes sense, because 5KQwrPbwdL6PhXujxW37FSSQZ1JiwsST4cqQzDeyXtP79zkvFD3 is the private key I already have in my wallet. So I moved forward to Step 4.
Step 4
I repeated Step 1, and yes I have the same imported public key & private key as you:
Now it is true that the public key I have on the eosio.token account looks incorrect:
But now when I want to change the keys on the eosio.token account, by using your command:
cleos set account permission eosio.token owner EOS6MRyAjQq8ud7hVNYcfnVPJqcVpscN5So8BhtHuGYqET5GDW5CV -p eosio.token@owner
… I cannot do it, because I get the same Error 3090003 than I had previously:
So I cannot complete Step 4 and change the keys on the eosio.token account. 
Thank you for your assistance!
Ok, in order to change the permission keys in for eosio.token account, you must have the old public/private key imported into your wallet (those that start with EOS8j77h… from your picture that shows the account info about eosio.token account). Just import it into your wallet, and try the Step 4 again. (you must have the old public/private key and the new and correct ones into the wallet).
I hope you have a backup about your private keys, i just show you one of my keys, not all of them, just to show you the correct public and private key that you must have imported into your wallet in order to later change the permissions of the eosio.token account.
If not, you have to start from scratch at least from the data that is saved into your OS (it happens to me many times, that is the reason that took me to create my own notes, to speed up my process every time i mess up with something)
2. Manually deleting the eosio blockchain data folder.
Open a Terminal window, we have to navigate to the “.local” folder
cd ~/.local/share/eosio/nodeos/Manually delete the “data” folder
sudo rm -vrf datarm is the command to delete any file/folder on linux, -vrf means [v = verbose to explain what is being done, r= remove directory and content recursively, f= force to ignore nonexistent files and arguments]
You will be promted with somethin like this thanks to the verbose option:
removed 'data/somethingFile'
removed 'data/otherFile'
removed directory 'data'
Now you can close this terminal window and start again the blockchain with the script “nodeos_start” that you have created before.
Hope you find this useful!
If you have any doubt, please let us know so we can help you!
Carlos Z.
Thank you for your instructions. This time, the permission step worked!  I was able to change the permission keys for the
 eosio.token account.
So, Step 4 and Step 5 OK!
However, issuing tokens in Step 6 still doesn’t work. I got the same error as before:
The same error I had several times previously:
ERROR: ExtrasError: [“1000 DOGCOIN”, “memo”]’]
Push a transaction with a single action
Thank you very much Carlos for your help, this is very helpful, and I am learning a lot with all this time typing on my terminal  But since I have been trying issuing tokens for a week now, maybe @filip can help?
In the meantime, I will check on EOS dev forums if they encountered the same ExtrasError message.
Glad to know that you made it work! 
I think you have an issue with your quotation marks. Why there are curvy instead of normal?
This is my example:
cleos push action eosio.token issue '["dogctrissuer", "1000 DOGCOIN", "memo"]' -p dogctrissuer@active
And my screenshot, see that my quotation marks are not curvy at all.
If you have any doubt, please let us know so we can help you!
Carlos Z.
This is right, you spotted correctly that the quotation marks were not OK (I don’t know why they were curvy in my terminal). So I replaced them with normal quotation marks, as follows:
cleos push action eosio.token issue '["swisseos", "1000 DOGCOIN", "memo"]' -p swisseos@active
However, I got another error:
ABI for contract eosio.token not found.
Action data will be shown in hex only. error 2020-05-28T12:24:21.748 cleos main.cpp:4013 main ]
Failed with error: Assert Exception (10) abis.valid(): No ABI found for eosio.token
I looked for a solution on EOS dev forums. I tried to use the command cleos set abi eosio.token, but it got things messed up, and now I cannot even do Steps 4 and 5 anymore, I am getting errors again.
I am going to start all over again, I think this is the best thing to do.
You probably forgot to add the command to create the ABI file for the eosio.token contract.
Take a look on my notes from this point: Payable Funtions/Token Creation setup.
The last command to deploy the contract should look like this:
cleos set contract eosio.token ~/contracts/eosio.contracts/contracts/eosio.token ./eosio.token.wasm --abi eosio.token.abi -p eosio.token@active
The “–abi eosio.token.abi” must be included in order to create or read the ABI file, but go step by step through my notes, i promise that following them will not give you any issue in the path.
Hope you find this useful!
If you have any doubt, please let us know so we can help you!
Carlos Z.
Hurrah! I finally succeeded in issuing tokens and completing the Token Creation section in the course! 

Thank you Carlos for your Github notes, I could check them along the videos.
About the ABI file, well, this was surprising to me, because I thought I had included the --abi command when I had deployed the contract, but as I had to go back and forth several times, I probably omitted it at some point.
As things had gotten messed up, I had to go back in the beginning of my wallet and accounts setup, and I see now it was the right thing to do to start again with a clean start. I removed the keys from my wallet, started with new keys and went through the steps of the course again.
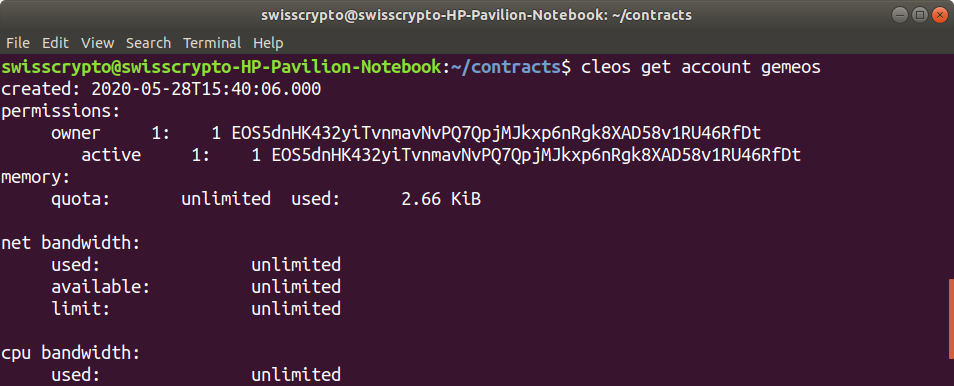
I created a new account that I called “gemeos”:
I could get account with my new keypair:
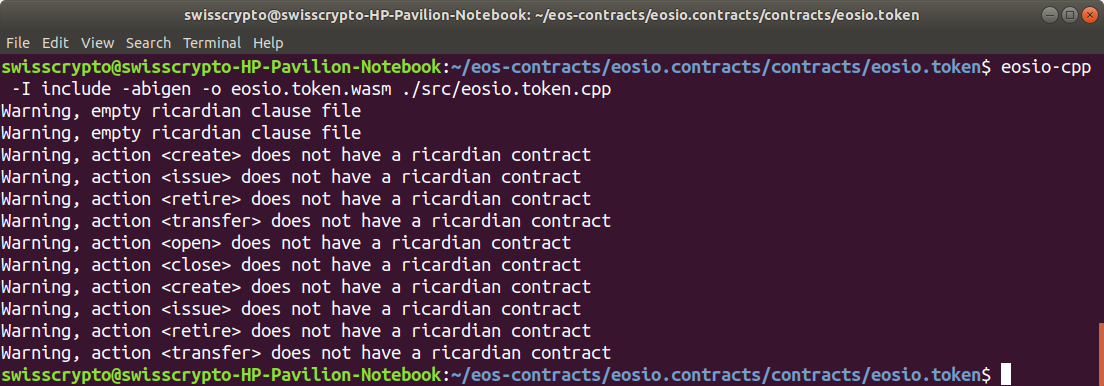
I compiled the contract:
Then I created the eosio.token account:
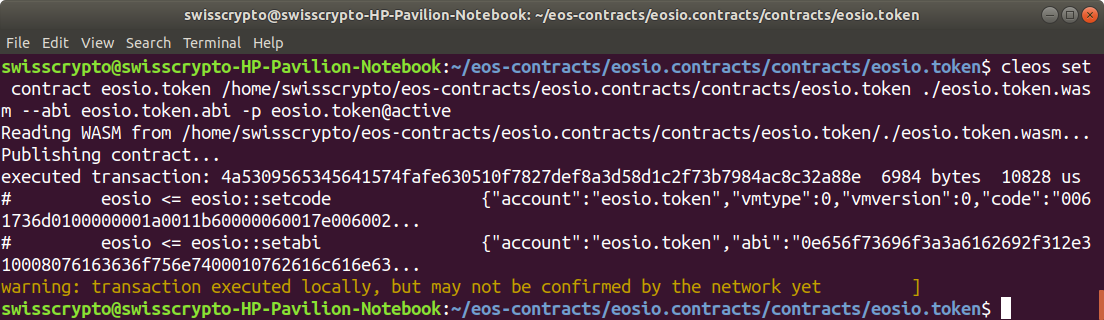
Then I deployed the contract to the eosio.token account (with --abi  )
)
I successfully created tokens:
And I successfully issued tokens, finally!! 
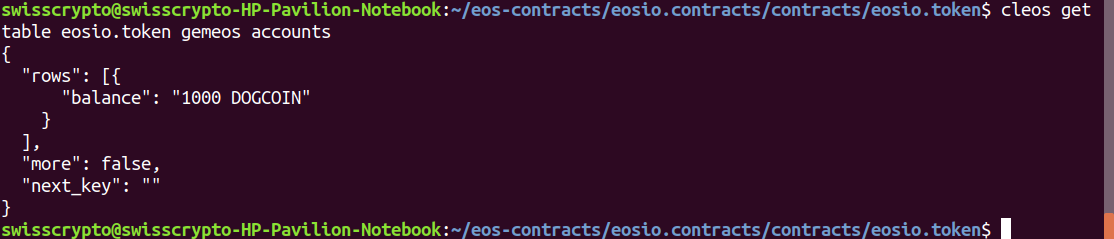
Lastly, I could check the account balance:
Thank you Carlos for your help and your patience!!
Congratulations sir! I know that EOS programming course is really hard to achieve, so be very proud of yourself! Welcome to the club of students that has been able to finish one of the most challenged course in the Academy! 
Carlos Z.
You’re welcome Carlos.
Well, the EOS 201 course is not completely finished yet, but the Token Creation section is completed. That was a big milestone!
I do not understand this error msg:
cherrybluemoon@Markandrews-MacBook-Pro eosio.token % cleos create account permission redruby active eosio.code EOS5kkQdeGrCiguLhyiLpNUpKWW6GsKFGi3J3YnkVts3SFb9zzm1x

Warning: Failed to set locale category LC_NUMERIC to en_NO.

Warning: Failed to set locale category LC_TIME to en_NO.

Warning: Failed to set locale category LC_COLLATE to en_NO.

Warning: Failed to set locale category LC_MONETARY to en_NO.

Warning: Failed to set locale category LC_MESSAGES to en_NO.
ERROR: ExtrasError: [EOS5kkQdeGrCiguLhyiLpNUpKWW6GsKFGi3J3YnkVts3SFb9zzm1x]
cherrybluemoon@Markandrews-MacBook-Pro eosio.token % cleos set contract eosio.token /Users/cherrybluemoon/eos-contracts/eosio.contracts/contracts/eosio.token ./eosio.token.wasm --abi eosio.token.abi -p eosio.code@active
Publishing contract...

Error 3090003: Provided keys, permissions, and delays do not satisfy declared authorizations

Ensure that you have the related private keys inside your wallet and your wallet is unlocked.

Error Details:

transaction declares authority '{"actor":"eosio.code","permission":"active"}', but does not have signatures for it.
Hello sir, the first error you are facing is because that’s not the proper way to create an account.
Command syntax is:
cleos create account eosio [accountNameHere] [ownerKey] [activeKey]accounts name must contain 12 words.
The second error, you are trying to deploy the eosio.token contract right? the issue is on the permission account, you should use eosio.token account, not eosio.code.
last command should be:
-p eosio.token@active
Remember you can use my notes to guide you on the process for the commands.
thecil/github/EOSIO CLI commands.
Hope you find this useful.
If you have any more questions, please let us know so we can help you!
Carlos Z.