
Welcome to the discussion thread about this lecture section. Here you can feel free to discuss the topic at hand and ask questions.
1 Like
Challenge 2:
Took me quite some time to figure it our my solution is actually working. 
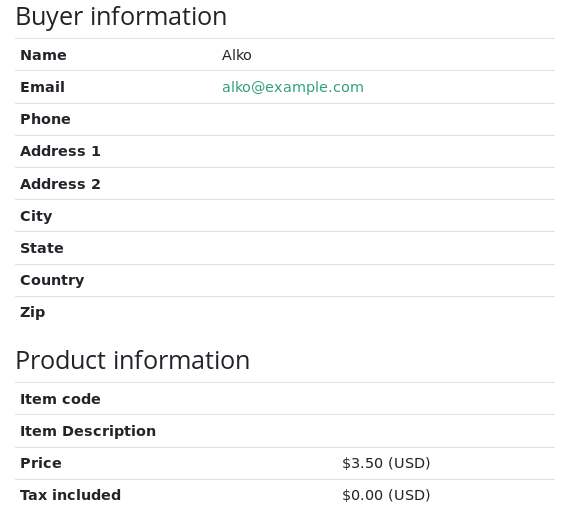
But you can only see the information on the BitPay dashboard. Can you change the invoice information shown to the user?
1 Like
Good job! What invoice information are you talking about?
It would have done it a week ago. But I was…offline! Neighbor cut my cable.
Can I change the design of the invoice and what is displayed? Here:
By the way, maybe its just me, but it was kind of to easy 
I think a better example for a LAPP would be how to create some kind of money streaming service. Like video streaming, not just how to create simple invoices. It would better present the capabilities of lightning network.
Can I do this using BitPay or would I be required to set up my own node to achieve the desired throughput?
No, since we are using the btcpay library to display the invoice we can’t change the look. However, when the invoice was created you get the invoice in both text and QR code in the response from the server. You can choose to display that however you like instead of using the btcpay library we imported. That’s how you can achieve more customization.
I understand that the challenge might be too easy for some people, it’s a difficult balance since we have both new and experienced devs here.
As for the streaming idea, I LOVE IT. However, the tech was not really ready when I recorded this course. Maybe I can add it in the future. Because now we should be able to do it.
Take a look at this blog post and the github commit linked within it: https://coinrivet.com/streaming-money-through-the-lightning-network-is-closer-than-you-think/.
As long as you have an up to date lightning node you can now send payments without an invoice. Which is really what you need in order to stream money. Now you only need to attach that to a server that will query the lightning node to send the payments every second or every minute or whatever. Unfortunately btcpay doesn’t support this right now through a nice interface, so you need to do it yourself.
1 Like
Ojojoj on the second challenge you say you think it’s the same people behind bitpay and btcpayserver, they’re not! There is a famous tweet from Nicolas Dorier https://twitter.com/NicolasDorier/status/898378514256207872?s=20 on bitpay segwit2x bullshit and says “I will make you obsolete”, that’s btcpayserver
2 Likes
Hahaha that’s great
1 Like
btw jfyi, the first 31 seconds of the 4th challenge ‘Challenge UI’ are bloopers you could edit out. Although it’s also kind of fun to watch haha
Hahaha, how come nobody told me before We will edit it and re-upload! Thanks.
I can tell you there have been worse mistakes edited out 
I got challenge two working and should lie when I say I didn’t look to the solution:-) But to show something else I made a solution to get 10 satoshis out of a faucet. Idea is to create a sort quiz. When you answer the right questions you will earn satoshis. To get users onboard I setup a faucet first where the users can get soms satoshis to start the quiz. When you go to http://btcexperiments.com/index.php/ you have to follow all the steps. In the last step you will get some satoshis out of a faucet so long there are, you can get them. Have to work on this further.
Perry
1 Like
I created a new challenge for myself and was wondering if this is possible first of all.
Idea is to create a sort quiz test. User have to pay for a quize, let’s say 10 satoshis. After payment a quiz comes up with random 10 questions (I know this step can be done). The next step that the user will get for every good answer a satoshi back is a difficult one seems to me. Could this be possible? Making use of return money?!
1 Like
Hello sir, I think it can be possible, you could try to create a function that track the amount of questions that are correct, but there is no way to “return the money”, let me put it this way:
- User pay 10 satoshis, got permission to 10 questions.
- User start the quiz, 1 question correct = 1 satoshi. (here is where the function comes up).
- User finish the quiz, lets say 7/10 correct, that meanst 7 satoshis earned.
- The function that calculate the amount of correct questions should then pass that data to another function.
- The other function does only have to create a payment to the address of the User, so in this case will have to create a transaction for 7 satoshis.
Is not a return money function, is a builder of a new transaction based on the amount of correct answers.
Hope you find this useful!
If you have any doubt, please let us know so we can help you!
Carlos Z.
2 Likes
Challenge 2:
I believe the documentation is incorrect about locality, region and postalCode:
locality => city
region => state
postalCode => zip
1 Like
Thanks, will try to work this out.
Perry
1 Like
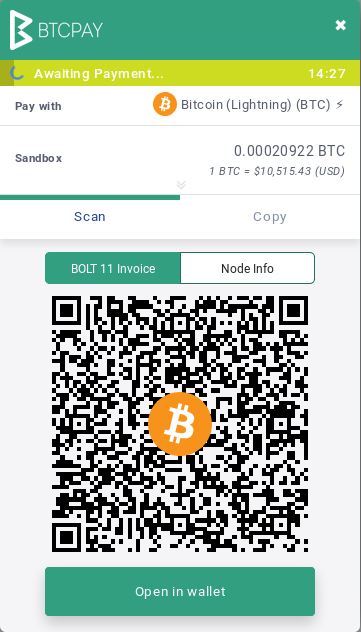
Like you, I wasted a lot of time looking for something more complex to change what was displayed in the actual btcpay modal popup. After days I gave up and looked at the answer video, and I too realized the task was only to capture the buyer fields and send them in the invoice creation request. That was the easy bit. The video says “to display the fields in the invoice” which everyone will assume is the modal invoice which is popped up from the store. @filip I think the video should be redone to not imply that.
Cheers
challenge 1 solution.
index.jade
div
  h2 Submit Payments in Dollars
  form(method='post', action='/invoice')
    p
      label(for='products') Choose a product:
      select#products(name='products')
        option( type='number',value='400') Television - $400
        option( type='number',value="500") Playstation 5 - $500
        option( type='number',value="549") Laptop - $549
        option( type='number',value="300") Phone -$300
    p
      input(for='products', type='submit', id='button', name='submit', value="Submit")
inovice.js : is the same i only changed the variable to products
//Create invoice.
router.post('/', function(req, res, next) {
  var products = req.body.products;
  client.create_invoice({price: products, currency: "USD"})
  .then(function (invoice)  {
    res.render("invoice", {invoiceId: invoice.id})
  })
  .catch(err => console.log(err));
});

3 Likes
Great job!  I like the theme I remember I made mine just white
1 Like
Very good approach. will learn a lot from it.
1 Like
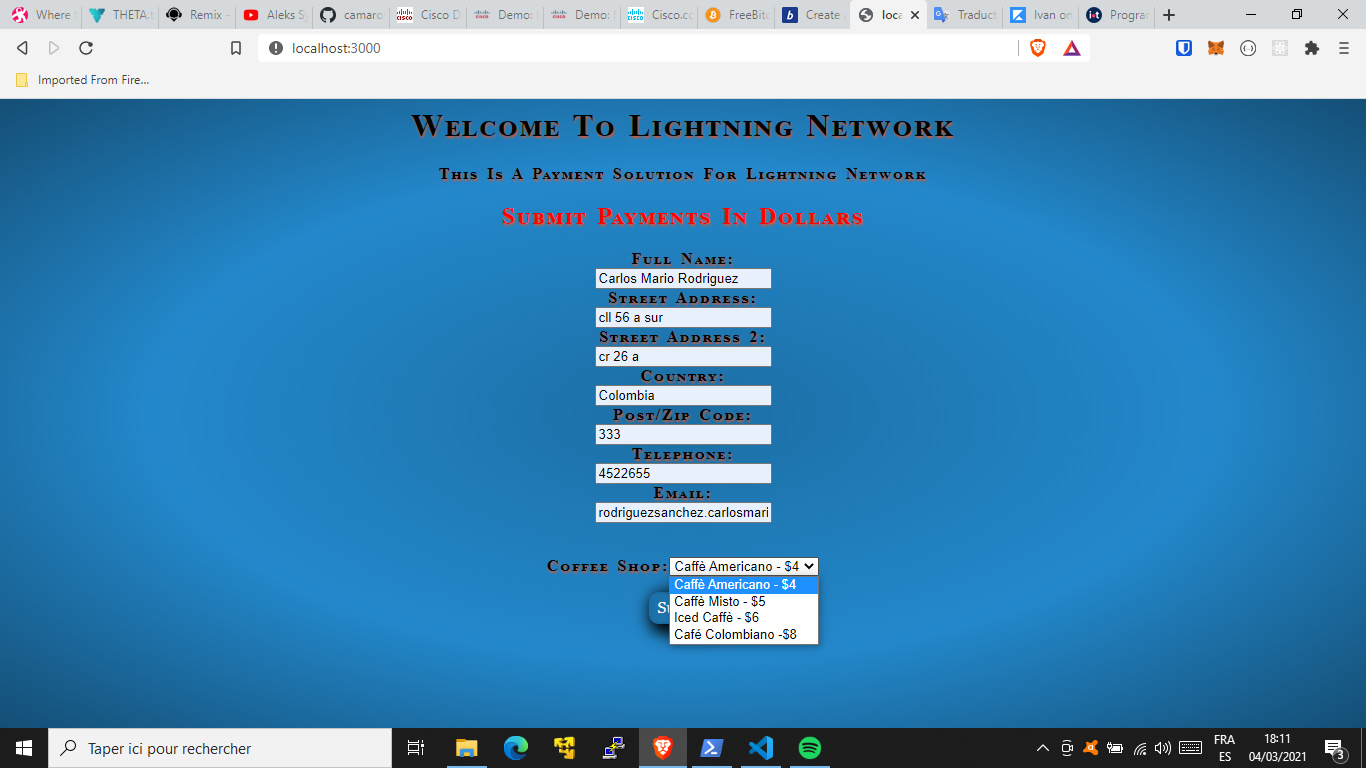
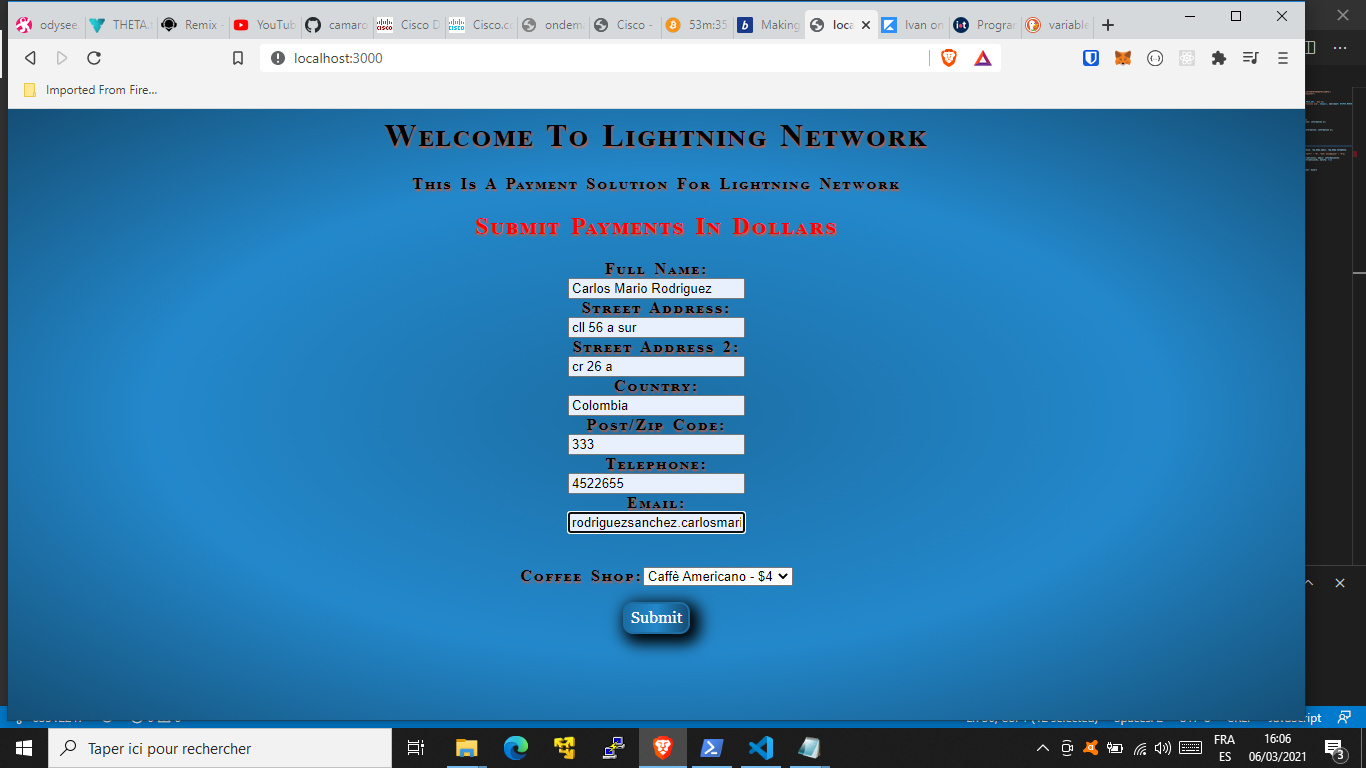
Challenge 2 solution.
I changed my products 
I had some problems but I looked at the discussion and I think is in this way
invoice.js
//Create invoice.
router.post('/', function(req, res, next) {
  var products = req.body.products;
  var information = [req.body.fname, req.body.saddress,req.body.saddress2, req.body.email, req.body.telephone,
  req.body.pzcode, req.body.country];

  var item = {'Caffè Americano' : "4", "Caffè Misto" : "5", "Iced Caffè" : "6", "Café Colombiano" : "8"};
  var buyer1 ={
    name: information[0], address1: information[1], address2: information[2], email: information[3],
    phone: information[4], postalCode: information[5], country: information[6], notify: true
  };


console.log(buyer1); // to check in backend
  client.create_invoice({
    price: item[products], currency: "USD", itemDesc: products, buyer: buyer1
    })
    .then(function (invoice)  {
    res.render("invoice", {invoiceId: invoice.id})
    })
    .catch(err => console.log(err));
  });

module.exports = router;
index.jade
div
  h2 Submit Payments in Dollars
  form(method='post', action='/invoice')
    p
      label(for='fname') Full name:
      br
      input#fname(type='text', name='fname')
      br
      label(for='saddress') Street Address:
      br
      input#saddress(type= 'text', name='saddress')
      br
      label(for='saddress') Street Address 2:
      br
      input#saddress2(type= 'text', name='saddress2')
      br
      label(for='country') Country:
      br
      input#country(type= 'text', name='country')
      br
      label(for='pzcode') Post/Zip Code:
      br
      input#pzcode(type= 'text', name='pzcode')
      br
      label(for='telephone') Telephone:
      br
      input#telephone(type= 'text', name='telephone')
      br
      label(for='email') Email:
      br
      input#email(type= 'text', name='email')
      br
      br
    p
      label(for='products') Coffee Shop:
      select#products(name='products')
        option( type='string',value="Caffè Americano") Caffè Americano - $4
        option( type='string',value="Caffè Misto") Caffè Misto - $5
        option( type='string',value="Iced Caffè") Iced Caffè - $6
        option( type='string',value="Café Colombiano") Café Colombiano -$8
    p
      input(for='products', type='submit', id='button', name='submit', value="Submit")

1 Like
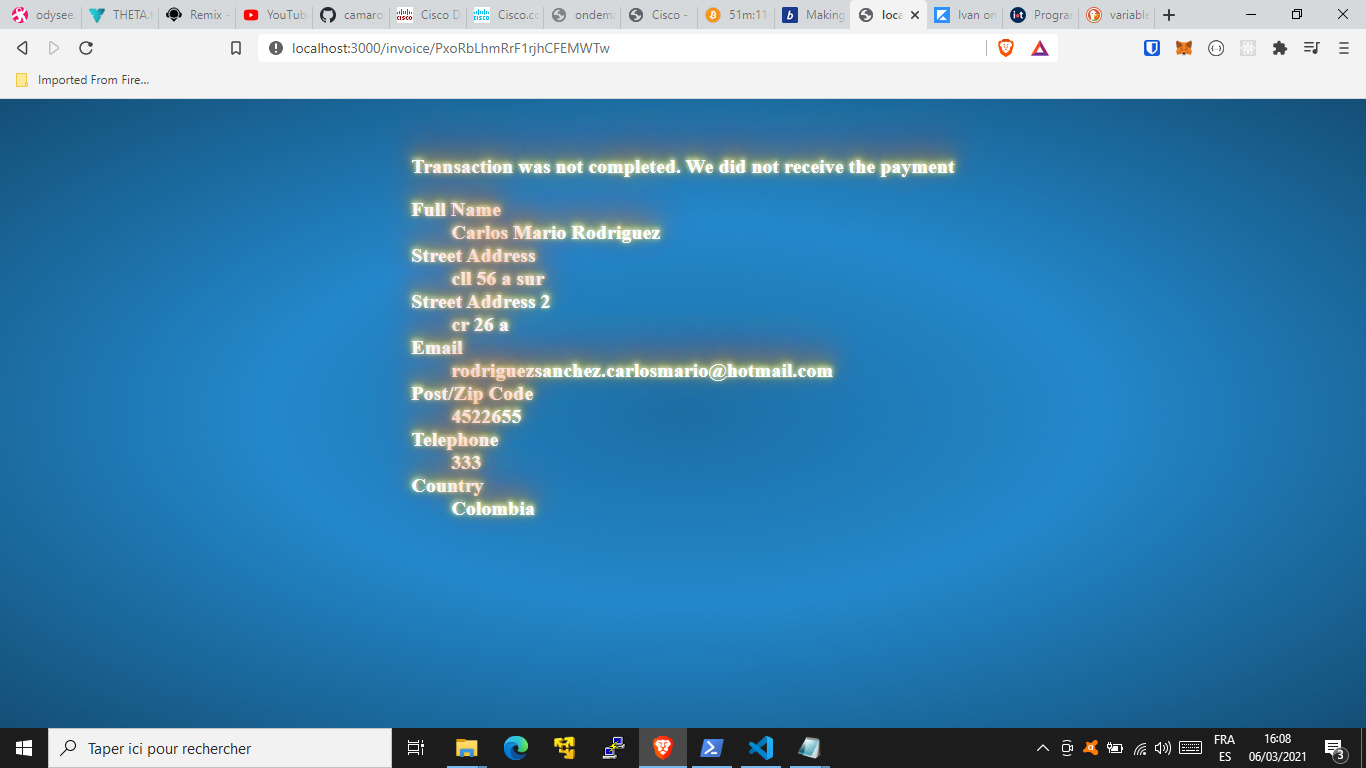
Challenge 3
I rendered and create two jade files paid.jade and nopaid.jade
notpaid.jade (paid.jade is the same I only changed a little on words displayed)
h2 Transaction was not completed. We did not receive the payment
    dl
      dt Full Name
      dd=failinformation[0]
      dt Street Address
      dd=failinformation[1]
      dt Street Address 2
      dd=failinformation[2]
      dt Email
      dd=failinformation[3]
      dt Post/Zip Code
      dd=failinformation[4]
      dt Telephone
      dd=failinformation[5]
      dt Country
      dd=failinformation[6]

style.
   body{
    height: 10em;
    font-size: 12px;
    position: relative;
    background: #1C6EA4;
    background: -moz-radial-gradient(center, #1C6EA4 0%, #2388CB 43%, #144E75 100%);
    background: -webkit-radial-gradient(center, #1C6EA4 0%, #2388CB 43%, #144E75 100%);
    background: radial-gradient(ellipse at center, #1C6EA4 0%, #2388CB 43%, #144E75 100%);

    }
    p,h2{
    margin: 0;
    position: absolute;
    font-size: 20px;
    top: 200%;
    left: 50%;
    margin-right: -50%;
    transform: translate(-50%, -50%);
    color: #FFF;
   text-shadow: #FFF 0 -1px 4px, #ff0 0 -2px 10px, #ff8000 0 -10px 20px, red 0 -18px 40px;
   }
invoice.js I rendered and declared var information out of router.post(
var information;

router.get('/:id', async function(req, res, next) {
  var invoiceId = req.params.id;
  client.get_invoice(invoiceId)

  .then(invoice => {
      if(invoice.status == "complete" || invoice.status == "paid"){
        res.render('paid', { title: 'Lightning paid', failinformation: information });
      }
      else{
        console.log(information);
        res.render('notpaid', { title: 'Lightning not paid', failinformation: information });
      }
  }).catch(err => {
      console.log(err);
  })
});

//Create invoice.
router.post('/', function(req, res, next) {
  var products = req.body.products;
   information = [req.body.fname, req.body.saddress,req.body.saddress2, req.body.email, req.body.telephone,
  req.body.pzcode, req.body.country];
  var item = {'Caffè Americano' : "4", "Caffè Misto" : "5", "Iced Caffè" : "6", "Café Colombiano" : "8"};
  var buyer1 ={
    name: information[0], address1: information[1], address2: information[2], email: information[3],
    phone: information[4], postalCode: information[5], country: information[6], notify: true
  };

  console.log(buyer1); // to check in backend
  client.create_invoice({
    price: item[products], currency: "USD", itemDesc: products, buyer: buyer1
    })
    .then(function (invoice)  {
    res.render("invoice", {invoiceId: invoice.id})
    })
    .catch(err => console.log(err));
  });
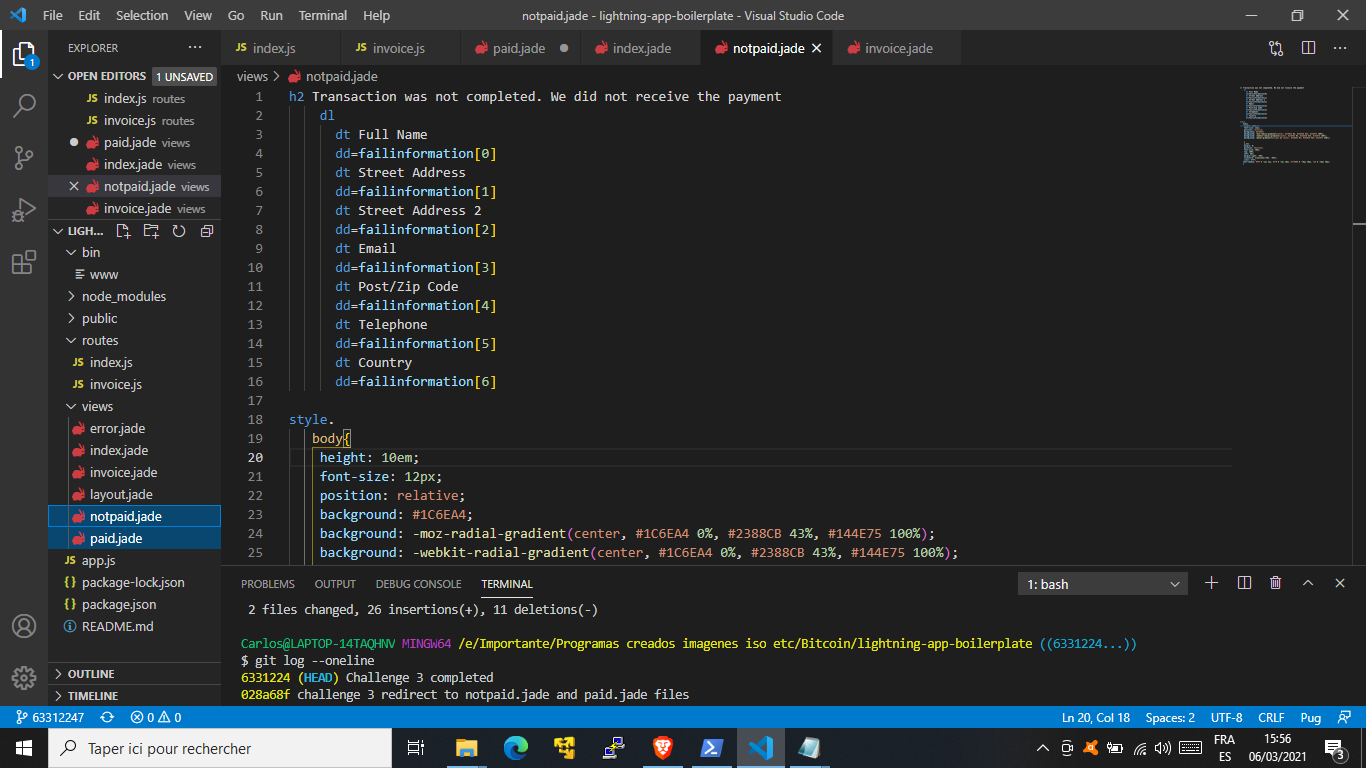
I closed here the invoice

1 Like